Update: I suggest reading a newer tutorial.
To keep focused on the technical setup, please refer to the introduction of this series for the reasons of choosing Staticman and GitLab.
Goal
To set up unauthenticated commenting system on GitLab pages.
This post aims at providing a walkthrough to the GitLab repo setup. If you want to host your own Staticman API instance, you may refer to the next post in this series.
Existing solution: GitHub mirror to GitLab
Staticman is a system which allows comments on static sites. However, it was limited to GitHub. Support for GitLab had been the most wanted feature for two years.
Zongren has proposed a wonderful workaround which makes use of GitHub webhooks and GitLab triggers. However, that’s not a genuine open source solution as it still depends on proprietary GitHub. Some users find this makes no sense at all.
Thanks to Nicolas Tsim’s pull request, it’s possible to run Staticman with native GitLab support. If you’re a free software purist, you may download the source code of everything and host them yourself.
Technical setup
This article assumes that you have
- a GitLab repo (for your blog)
- a dummy GitLab account (the “GitLab bot”, you may use my bot @staticmanlab.)
- an instance of Staticman v3 API server holding the bot’s person access
token.
(Again, you may use my instance of the API server running on a Heroku free dyno.)
In case of doubts, you may view my demo project (source).
What #3 does is to send data from an HTML <form> (as a POST request) to the
API server, which instructs #2 the GitLab bot to create merge request to #1 the
GitLab repo for your blog.
If you’re unsure what my API instance do, I’ll invite you to view
its source code. In particular,
my customizations against staticman/dev branch.
-
In your GitLab project page, go to Settings → Members.
-
Grant the GitLab bot “developer” access.
(Edited on Nov 18, 2018, as a follow-up to halogenica/beautifulhugo#222)
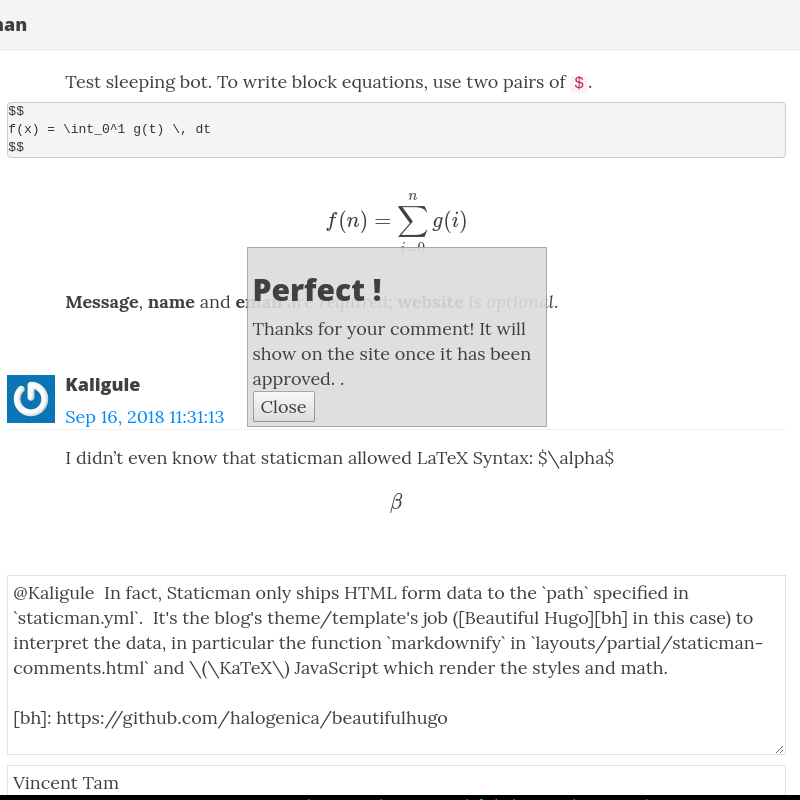
According to the setup guide in Staticman PR 219, at this point, you’ll be able to post comments.
However, as can be seen from my comments, I stopped messing things up after including my OAuth application ID and secret for authenticated comments in config filestaticman.yml. Even though I’m not 100% sure if the steps 3–6 are required, I advise you following them.Steps 3–7 are optional steps for authenticated comments. You may copy a suitable
staticman.yml**file from your blogging theme, change/delete the reCaptcha key, and proceed with step 8. (say, the one from Beautiful Hugo)1comments: 2 allowedFields: ["name", "email", "website", "comment"] 3 branch : "master" 4 commitMessage : "New comment in {options.slug}" 5 path: "data/comments/{options.slug}" 6 filename : "comment-{@timestamp}" 7 format : "yaml" 8 moderation : true 9 requiredFields : ['name', 'email', 'comment'] 10 transforms: 11email : md5 12 generatedFields: 13date: 14 type : "date" 15 options: 16 format : "iso8601" 17 reCaptcha: 18enabled: true 19siteKey: "6LeGeTgUAAAAAAqVrfTwox1kJQFdWl-mLzKasV0v" 20secret: "hsGjWtWHR4HK4pT7cUsWTArJdZDxxE2pkdg/ArwCguqYQrhuubjj3RS9C5qa8xu4cx/Y9EwHwAMEeXPCZbLR9eW1K9LshissvNcYFfC/b8KKb4deH4V1+oqJEk/JcoK6jp6Rr2nZV4rjDP9M7nunC3WR5UGwMIYb8kKhur9pAic="For instance, you may view my second demo site (with proper comment reply support) and its source.
-
Under your account settings, choose Applicatons.
-
Add a new application (for visitors to authenticate themselves on your site).
Fields actions Name Whatever name you like, so that you can recognise it in the future. Redirect URI Your blog URL; “localhost” for local testing Scopes ☑ api, ☑ read_repository -
The application ID and secret should appear.
-
GET /encryptapplication ID and secret. You may enter the following URL in the address bar of your web browser.https://<your-api-instance>/v3/encrypt/<text>You may replace
<your-api-instance>and<text>with the domain name of your Staticman v3 API instance and the text to be encrypted respectively. For example, if you’re using your API instancefoobar.herokuapp.com, you may typehttps://foobar.herokuapp.com/v3/encrypt/l3lsdh5and replace
l3lsdh5with your actual application ID and secret. -
Hook the API server and the bot up with the GitLab repo.
Add the encrypted strings to your
staticman.yml. Replace the fields with yours. You may view mystaticman.ymlas a reference.gitlabAuth: clientId: phApfhlPYrReszwh9V... clientSecret: LyknknJah7mbYWtbcgET... redirectUri: http://vincenttam.gitlab.io/test-hugo-staticman/Add these lines (for generated fields) to this YML files as well to avoid
MISSING_FIELDSerror, or even copy the existing examples.generatedFields: authType: type: user options: property: "type" email: type: user options: property: "email" username: type: user options: property: "username" name: type: user options: property: "name"The GitLab bot grabs this YML file for the API server to decide which fields to be written to your GitLab repo. The target path inside the repo is determined by
  # Destination path (directory) for the data files. Accepts placeholders.
  path: "data/comments/{options.slug}"
Staticman is only responsible for delivering the comments from commentators to the site owner’s designated
path(inside the GitLab repo). You have to consult your blog template’s README / documentation in order to set up thepathcorrectly for displaying comments. -
Hook the HTML form up with the Staticman API server.
Edit your site config file for your blog. (The actual file name dependes on the generator. Hugo calls it
config.toml; Jekyll names it_config.yml.) Include the API address as well as the merge request target URL. Actual setup can vary depending on your site generator/theme.However, the basic working principle is universal. The
codein the blog template’s HTML<form action="{{ code }}">determines the recipient API server. Take this blog’s theme (Beautiful Hugo) as an example.$ git grep '<form' layouts/partials/staticman-comments.html:<form class="js-form form" method="post " action="{{ .Site.Params.staticman.api }}">The code
.Site.Params.staticman.apiis found, meaning that Staticman’sapihas to be configured.In any case, the API URL in the form action has comply with the new standard for the
/entryendpoint./v3/entry/:service/:username/:repository/:branch/:property:service: currently supportsgithubandgitlab(e.g.gitlab):username: your GitHub/GitLab user name (e.g.vincenttam):repository: your repository name (e.g.test-hugo-staticman):branch: the branch against which the GitHub/GitLab bot create pull/merge request (e.g.master):property: this matches exactly one of the unindented lines instaticman.yml. See its top comment block to know more.
-
(Optional) Set up reCAPTCHA to stop SPAM / machine generated comments.
Beautiful Hugo’s README provided a simple way to set up the site config files. However, the author of this README simply put reCAPTCHA’s
secretfield. without further explanations. In fact, according the official documentation aboutstaticman.yml, thissecretfield should be/encrypted like the application ID in step #4.In
staticman.yml:reCaptcha: enabled: true siteKey: "6LeGeTgUAAAAAAqVrfTwox1kJQFdWl-mLzKasV0v" secret: "hsGjWtWHR4H...ur9pAic="In
config.toml:[Params.staticman.recaptcha] sitekey = "6LeGeTgUAAAAAAqVrfTwox1kJQFdWl-mLzKasV0v" secret = "hsGjWtWHR4H...ur9pAic="
Use my API instance for testing and educational purposes only. Never use it for production since Heroku free dynos aren’t for that. (Free dynos idle after 30 minutes of inactivity.)
| config file | intepreted by | function |
|---|---|---|
(_)?config.* |
static site generator | The blog uses this to send form to the API. |
staticman.yml |
Staticman API server | The GitLab bot creates merge requests according to this file. |
Usage
-
Now, you should be able ot submit comments by clicking .
-
To approve them comment, log in the site owner’s GitLab account, go to your repo page and click Merge Requests.
-
Accept comment?
decision action ✓ merge, ☑ delete source branch ✗ close -
Wait until the site rebuild finishes. (You may view the progress in CI / CD → Pipelines.)
Additional feature: posting without approval
Provided that the target audience of the blog is somebody you trust (say, your colleagues), you may want their comments instantly available after the site rebuild without your approval.
Since master branch is a protected branch by default, the site owner has to
grant rights for “developers” to merge and to push against master branch.
- Go to the repo’s Settings ➔ Repository .
- In Protected branches, at the row representing
masterbranch, for each drop-down list, uncheck “Masters” and check “Developers + Masters”.


